
Basic Models
Basic Models are usually small devices that cannot function without being installed in another device. Basic Models are typically used within configured models and do not require an Asset ID, but they can be added to inventory and tracked as assets if needed.
Also included in Basic Models are cables. Unlike other models, cables do not need to be added to inventory in order to be used in the data center. Any cable models added to the Cables group and approved will be available to define a connection. For more information on cable management, see [Connectivity documentation].
Creating Basic Models
Basic models can be created using the Basic Models features.
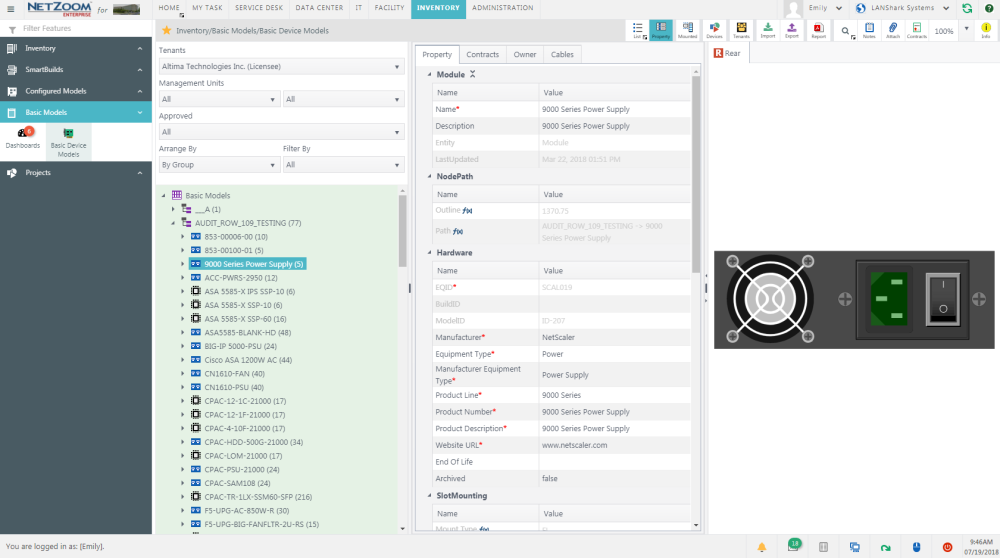
Feature Path: Inventory/Basic Models/Basic Device Models
Adding a Basic Model from the Device Library
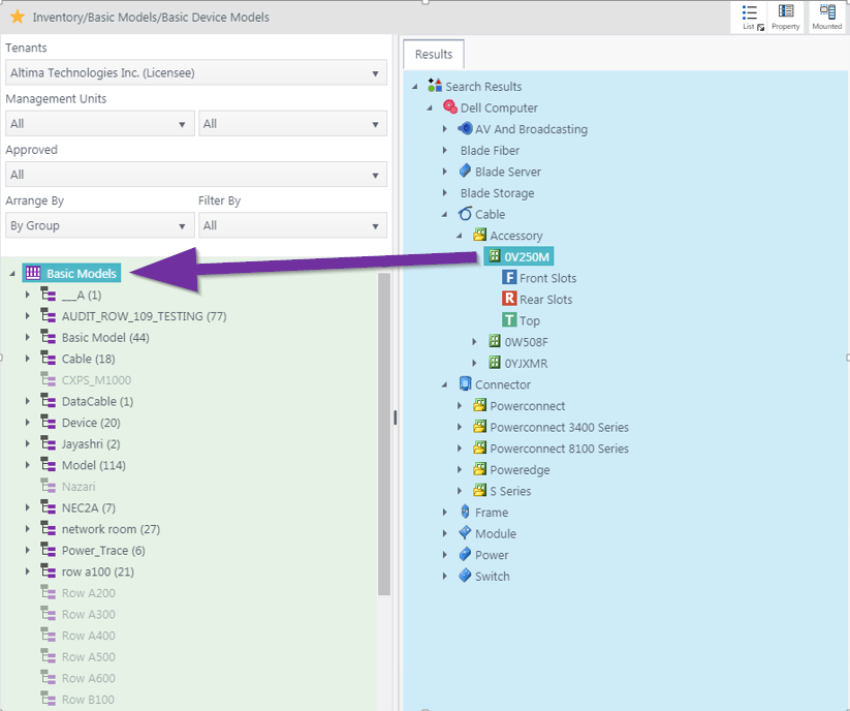
- To add an instance of a basic model from the device library, click QA: Devices. The Search pane and the Results pane will appear.
- Search for the device shape you want to add in the Search pane. If your model has sub-models and the required device models do not exist, NetZoom will automatically generate and approve the missing basic models for you.
- Select the shape you want to add from the Results pane and drag-and-drop it to the desired location in the Infrastructure Explorer pane. The Add Model form will pop up.
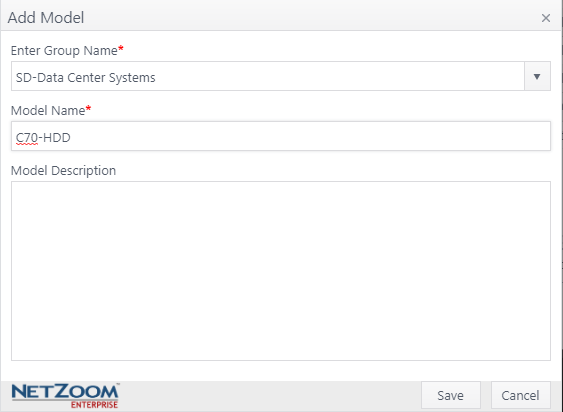
- Choose a group for the model from the Enter Group Name combo box. Entering a new group name will create a new group.
- Provide a name and description for the basic model.
- Click the [SAVE] button. A copy of the selected model will be added from the Device Library to the selected group in Basic Models.
Approving a Basic Model
- To approve a basic model, right-click on the model you want to approve in the Infrastructure Explorer pane.
- Click [APPROVE]. The device will be approved and can be used in the inventory.
- Right-clicking on a group and clicking [APPROVE] will approve all models in that group.
Unapproving a Basic Model
- To unapprove a basic model, right-click on the model you want to un-approved in the Infrastructure Explorer pane.
- Click [UNAPPROVE]. Note: You cannot unapprove models that are in use in the inventory or data center.
- Right-clicking on a group and clicking [UNAPPROVE] will unapprove all models in that group that are not in use.
- Note: To prevent additional inventory items from being created for an approved model, set the Archived property to True.
Cloning a Basic Model
- To clone a basic model, right-click the model you want to clone and click [CLONE]. The Clone Device form will pop up.
- Choose a group for the model from the Enter Group Name combo box. Entering a new group name will create a new group.
- Enter a name and description for the model. This must be different than the parent model.
- Click the [SAVE] button. The model will be cloned and added to the Infrastructure Explorer.
Deleting a Basic Model
- To delete a basic model, right-click the model you want to delete. You cannot delete models that are approved.
- Click [DELETE]. The model will be deleted.
- Right-click on a group and click [Delete All Unapproved Devices] to delete all models in that group that are not approved.
- Right-clicking on a group and clicking [Delete Group] will only delete the group if it is empty.
Exporting Basic Models to an Excel spreadsheet
- Select a Basic Model or Group.
- Click QA: Export. The Export form will pop up.
- Select Node Hierarchy or Update Property. Node Hierarchy exports model configurations, while Update Property exports model properties.
- Click the [EXPORT] button. The basic models will be exported as an Excel spreadsheet
Importing Basic Models from an Excel spreadsheet
- Select a Basic Model Group.
- Click QA: Import. The Import form will pop up.
- Select Node Hierarchy or Update Property. Node Hierarchy adds new models, while Update Property updates existing models. The Verify and Import form will pop up.
- Click the […] button to open a search form.
- Select the spreadsheet containing your basic models and click the [OPEN] button.
- Click the [SAVE] button when finished. Your basic models will be imported.
Note: For more information on formatting this spreadsheet, see [import documentation].
Adding Cables to NetZoom as Models
- To add cables to NetZoom as Basic Models, navigate to the Basic Models feature.
- Use QA: Device Library to search for the cable models you want to add. For more information on searching the device library, see [Inventory-device library documentation].
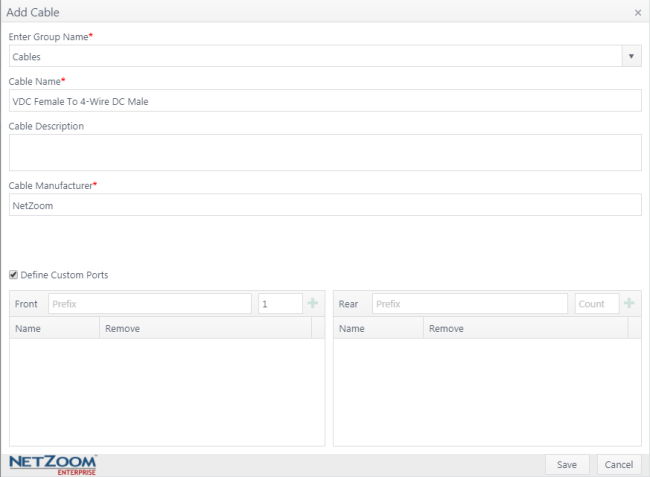
- When you have found the cables you want, click and drag them from the Results pane to the Cables group in the Infrastructure Explorer. The Add Cable form will pop up.
- If you are adding a One-To-Many cable, check [X] the Define Custom Ports option. The Define Custom Ports pane will appear.
- Enter a prefix and a number for the Front ports and click the PLUS icon to add those ports to the "front" of the cable. Repeat this for the Rear ports.
- Click the [SAVE] button to add your cable to basic models.
Path: Inventory/Basic Models/Basic Models
Basic Models must be approved before they can be used. Approved models in the Cables group will appear as options in the Pick Cable pop up when making a connection.
Available Quick Actions
Last Updated: Tuesday, December 22, 2020
NetZoom, Inc.