
Users
Users can be registered with NetZoom using the Users feature.
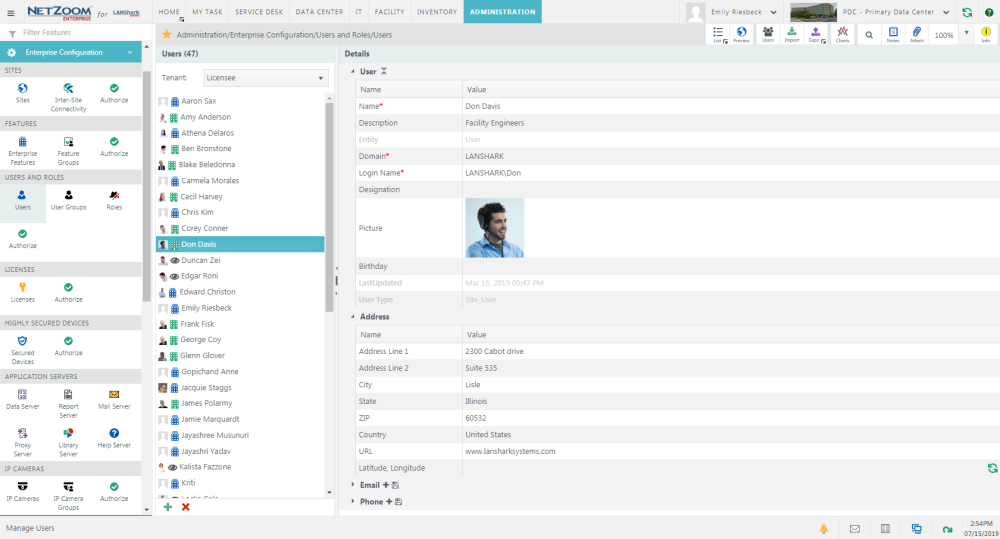
Feature Path: Administration/Enterprise Configuration/Users and Roles/Users
The Users feature has two panes. The Users pane lists users, filtered by tenant. The Details pane lists the properties of a selected user.
Adding a New User
- To add a new user, select the company you want to add a user for from the Tenant drop-down box. By default, the licensee is selected.
- Click the
 icon at the bottom of the Users pane. A blank form will appear in the Details pane.
 - Fill out the form. The following properties are available:
- Name: The name of the User.
- Description: A description of the user.
- Domain: The Domain associated with the user. This is a required field.
- Login Name: The user’s login. This is a required field.
- Designation: A designation for the user, such as their title.
- Picture: An image associated with the user. Typically, this is intended to be a photograph of the user.
- Birthday: The user’s date of birth.
- Address: the Address information of the user.
- Email: The email associated with the user. This is a required field.
- Phone: The phone associated with the user. This is a required field.
- Phone Type: The type of phone number. Work is default.
- Click the [SAVE] button. The user will be saved and added to the Users pane.
Note: In order for the user to receive SMS text messages, additional phone numbers need to be added depending on the Mail Server delivery profile. Click the [+] next to Phone to add an additional record.
If the Mail Server is set to Email, then the Mail Server will be used for delivery. Users must provide their phone number with SMS gateway provider [EX: 6302816464@txt.att.net, if mobile provider is AT&T] and select Phone Type as “Email SMS”.

If the Mail Server is set to Phone, then Twilio or another similar delivery service will be used for delivery. Users must provide their phone number and select Phone Type as “Phone SMS”.
![]()
Editing a User
- To edit an existing user, select the user you want to edit in the Users pane. The user’s properties will appear in the Details pane.
- Alter any properties you want to change in the Details pane. Changes are saved automatically.
Adding additional Phone and Email
- To add an additional phone or email to a user, select the user in the Users pane. That user’s properties will appear in the Details pane.
- Click the
 icon next to the phone or email fields, respectively.
 - Enter the phone or email, respectively.
- Click the
 icon next to phone or email. The phone or email will be saved.
Importing Users from Active Directory
NetZoom integrates with Active Directory. Users can be imported directly from Active Directory. Note: users you want to import must be put into the NetZoom Organizational Group. For more information on properly formatting Active Directory for importing users, see the section on AD Environment Pre-Configuration in the NetZoom Installation Reference Manual
- Click QA: Import Users from Active Directory
 . The Active Directory Users form will popup.
 - Fill in the LDAP URL and a domain administrator username and password.
- Click the [LOAD USERS] button. Users within the NetZoom Organizational Unit will be listed below.
- Click the [IMPORT] button. Listed users will be added to NetZoom.
Exporting Users to an Excel Spreadsheet
- To export Users to an Excel spreadsheet, click QA: Export. Users and their related properties will be exported as an Excel spreadsheet.
Importing Users from an Excel Spreadsheet
- To import users, Click QA: Import. The Verify and Import form will popup.
- Click the […] button to open a search form.
- Select the spreadsheet containing your users and click the [OPEN] button.
- Click the [SAVE] button when finished. Your users will be imported.
Note: Your Excel spreadsheet must be properly formatted. For more information on formatting this document, see the Implementation Through Automation Guide.
Deleting a User
- To delete a user, select the user you want to delete in the Users pane.
- Click the
 icon. The selected user will be deleted.
Other Quick Actions
- List View: provides a quick way to review the properties of multiple users in a grid format
- Preview: provides a map of all users organized by their associated tenants and roles
Available Quick Actions
Last Updated: Monday, January 25, 2021
NetZoom, Inc.