
Advanced Topic : Customizing Templates for use with NetZoom Visio Add-in
Diagram templates are managed using the Report and Diagram features in the NetZoom Web Client interface. For details on Adding, Downloading or Removing Templates or Editing Template Settings, see the Reports & Diagrams section of the NetZoom User’s Guide.
Downloading Existing Templates
To customize an existing Visio template:
- Log into the NetZoom Web Client
- Navigate to Administration/Reports and Diagrams/Reports andDiagrams/Reports
- Select an existing template and click the
 icon to download it.
- Browse and select a path to save the template.
- ClickSave.
Customizing Rack & Row Diagram Templates
Rack diagrams help you view areas of your data center in full detail, without having to leave your desk. Rack elevations and schematics diagrams are auto-generated on demand and can be customized using Microsoft Visio based templates.
To customize a Visio template:
- Open the template and customize the Background page with a header, footer, title, title blocks, etc.
- Rectangular placeholders are used in templates to indicate the size and position where racks should be placed when the Diagram is populated. Modify the Front and Rear pages in the same manner by copying and pasting existing placeholders and text labels to represent more racks or floor equipment in a location.
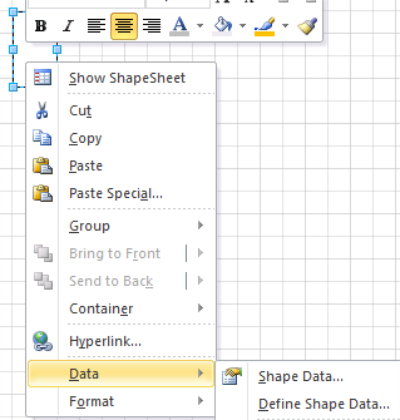
- Each placeholder and text label comes with pre-defined properties. You can provide properties to each placeholder and text label for display or for use in data graphics. When defining properties, make sure the Label and Prompt match the property name as defined in NetZoom.
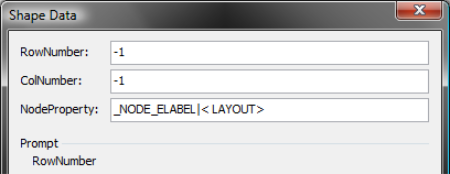
- For each placeholder and text label, define the row number and column number property.
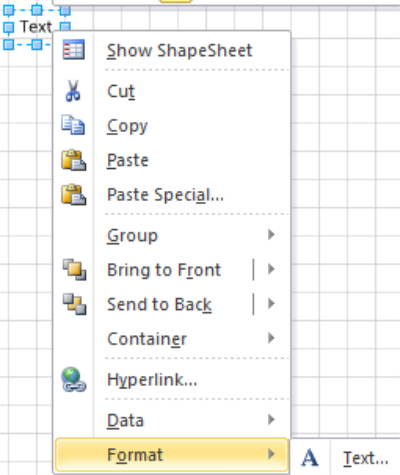
- For each text label, define a property ‘NodeProperty’. This property allows you to display a variety of data on the text label. Each property you wish to show in the text block must be in entered within the Value field in this format:_Node_[PropertyName].
For Example, to display the label of an item, enter ‘_Node_eLabel’.
The tilde (~) corresponds to a line break between each property you enter. To provide static text, provide a | (bar) with the static text within angular brackets < >.
Example: “_Node_eLabel~_Node_AssetID“ or “_Node_eLabel|<FRONT>” or “_Node_eLabel|<REAR>”. Make sure the property names you enter match exactly with the property names provided in NetZoom. This is useful for creating text labels for placeholders or creating a title for the floor layout. In case of a dynamic title label, make sure the row and column number values are -1.

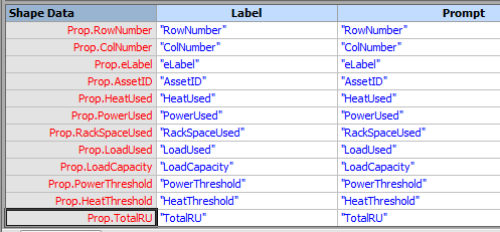
- Any new property added to a placeholder and/or text label must be renamed in the Microsoft Visio Shape Sheet. Within the shape sheet, under the Shape Data section, rename each property in Red to match the label and prompt so the field is displayed asProp.[PropertyName].
- Modify the row number and column number property value for each placeholder and text label to correspond to each rack or floor equipment in a location. To provide generic placement for each rack or floor equipment, provide -1 for row and column number values for the placeholders and text labels. Providing specific row and column numbers ensures precise placement for the racks and floor equipment on your floor plan along with appropriate data. If you provide specific row and column values, they must be unique in the template. Duplicate row and column combinations will cause errors while generating the diagram.
- You can also provide data graphics for placeholders using the properties you defined for placeholders.
- Save the template and re-import the template with a new name after modifying it. Rack diagrams and schematic diagrams can use the same templates as long as they are imported individually for each.
Note: If you require customized templates for your data center, you can e-mail us at Support@NetZoom.comor call us at 630.281.6464 (8:30 AM – 5:30 PM Mon – Fri US CST). We can create customized templates for a service fee.
Adding a New Row Diagram Template
To add a new row diagram template:
- Log into the NetZoom Web Client
- Navigate to Administration/Reports and Diagrams/Reports and Diagrams/Reports
- Click the
 button. A blank form will appear in the Detailspane.
- Enter a name for the template. A description is optional.
- Select Visio Diagram as the format.
- Using the Template File field, browse to select the template file for upload.
- Check [X] the Location entity in the Apply to Entities drop down box.
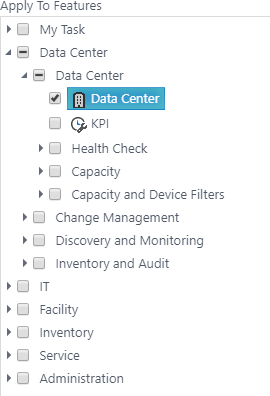
- In the Apply to Features pane, check [X] the Data Center feature.
- Select the desired diagramming settings.
- Click the SAVE button when finished. The template will be available for use in the NetZoom Visio Add-in.
Adding a New Rack Elevation Template
To add a new rack elevation template:
- Log into the NetZoom Web Client
- Navigate to Administration/Reports and Diagrams/Reports andDiagrams/Reports
- Click the button. A blank form will appear in the Detailspane.
- Enter a name for the template. A description is optional.
- Select Visio Diagram as the format.
- Using the Template File field, browse to select the template file for upload.
- Check [X] the Rack entity in the Apply to Entities drop down box.
- In the Apply to Features pane, check [X] the Data Center feature.
- Select the desired diagramming settings.
- Click the Save button when finished. The template will be available for use in the NetZoom Visio Add- in.
Last Updated: Thursday, August 13, 2020
NetZoom, Inc.