
Data Center (Site Specific Data)
Import Site Plot and Location Hierarchy
Import using feature path: Administration/Tools/Implementation Imports/Data Center Imports
- ID: A unique numerical value for use in indicating the equipment hierarchy during import.
- ParentID: The ID of the parent device in the equipment hierarchy. Use -1 for the top location, usually EntityName Plot.
- EntityName: The Location Type. Options are: Plot, Building, Roof, BuildingLevel, Room, RoomRaisedFloor, RoomCeiling, RoomSubFloor, Wall, and Location.
- Name: The name of the Location.
- X: The X coordinates of the floor tile position for EntitiyName Location.
- Y: The Y coordinates of the floor tile position for EntitiyName Location.
- Width: The width of the logical location for EntitiyName Location.
- Length: The length of the logical location for EntitiyName Location.
Optional fields include:
- Description: A brief description of the Location you are creating.
- RowLabel: The starting row label for the room’s tiles.
- ColumnLabel: The starting column label for the room’s tiles.
- Unit: The unit of measurement for the Location dimensions, in feet.
- Height: The height of the physical Location, not used for EntityName Location.
Import Node Hierarchy
Import using feature path: Administration/Tools/Implementation Imports/Data Center Imports
- ID: A unique numerical value for use in indicating the equipment hierarchy during Import.
- ParentID: The ID of the parent device in the equipment hierarchy. Use -1 for floor mounted equipment. (Unless the Parent Location is on the same sheet, in which you use -1 for Locations.)
- EQID: A unique identifier that NetZoom uses to differentiate between all of the shapes in our library. While NetZoom has a tool built in to help users identify the EQID of the device that they are looking for at the time of import, best practice is to not use this tool. Instead sort your data and remove duplicates so you’re left with a list of all unique kinds of devices that appear in your data center. Use this list and search NetZoom for the shapes and notate the EQID’s of the shapes you identify into your spreadsheet. That way you’ll be sure that the HP DL360 that NetZoom identified is the correct HP DL360 G9 model and not an out-of-date HP DL360 G1.
- Name: The display name of the Device in NetZoom
- AssetID: Asset ID’s are tags that enterprises typically place on all devices as part of their Asset Management Policy. Asset ID’s are required to be unique across the entire enterprise.
- MountType - A code that NetZoom uses to let the application know how the Device is mounted in the data center. This differentiates between a Rack that sits on the floor and a Server that lives in a RU of a Rack. Node Mount Type Codes for Import lists all of the possible Mount Types.
- Position: The RU or slot that the devices starts on, by default NetZoom mounts devices from the bottom up, so the lowest RU a device occupies should be listed here. Enter 0 for floor devices.
- Manufacturer: The name of the Manufacturer who created the device.
- MfgProdNo: The Manufacturer’s Product Number or Model Number for the Device.
Optional fields include:
- EntityName: This field is only required when Locations are also on the same sheet as equipment and specifies the entity type of the record, example: use Location for logical locations, Rack for Racks and Server for Servers.
- X: The X coordinates of the floor tile position for floor devices. This value is the distance from the parent physical location in inches.
- Y: The Y coordinates of the floor tile position for floor devices. This value is the distance from the Parent Physical Location in inches.
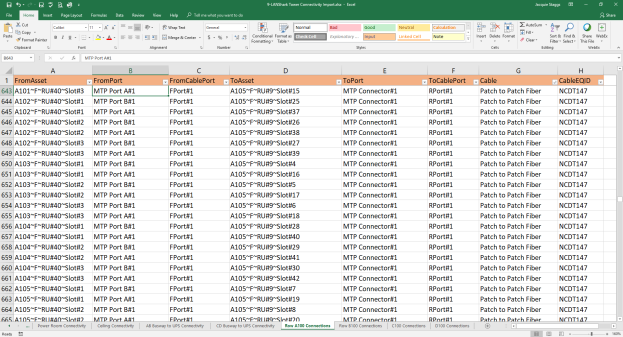
Import Power and Network Connectivity
Import using feature path: Administration/Tools/Implementation Imports/ /Import Connectivity
- FromAsset: The Asset and Location of the port from which you are making your connection. You will require the Asset ID of the Rack, then a ~ character, then its view (F for Front or R for Rear), then a ~ character, then Rack Unit containing the equipment.
- Example: ASSETID~F~RU#4
- You can also use the Asset ID of the Device or Module; this will result in a much shorter location path. For some Devices, it can stop at the Device view if that’s where the Port in question resides.
- Example: ASSETID~F
- If the Port is within a Card/Module within a Chassis, then provide an additional ~ character, and list the slot label containing the desired Card/Module (note: this may transit more than one Slot as in the example)
- Rack Example: ASSETID~F~RU#4~Slot#2~Slot#1
- Device Example: ASSETID~F~Slot#2~Slot#1
- FromPort: The Port Name from which you are making your connection; it should appear exactly as it does in NetZoom. Typically, that means the type of port that is along with a Port Number, such as RJ45#1.
- FromCablePort: The Port Name of the cable that you are using to make your connection; it should appear exactly as it does in NetZoom. Typically that Port Number is FPort#1.
- ToAsset: The same format as FromAsset but for the destination Port.
- ToPort: The same format as FromPort but for the destination Port.
- FromCablePort: The same format as FromCablePort but for the destination Port; it should appear exactly as it does in NetZoom. Typically that Port Number is RPort#1.
- CableEQID: The EQID of the cable model you wish to use. EQID is a unique identifier that NetZoom uses to differentiate between all of the shapes in our library. When using this field, leave the ModelID field blank.
- ModelID: This can be used to specify a specific model of cable you have customized in NetZoom. When using this field, leave the CableEQID field blank.
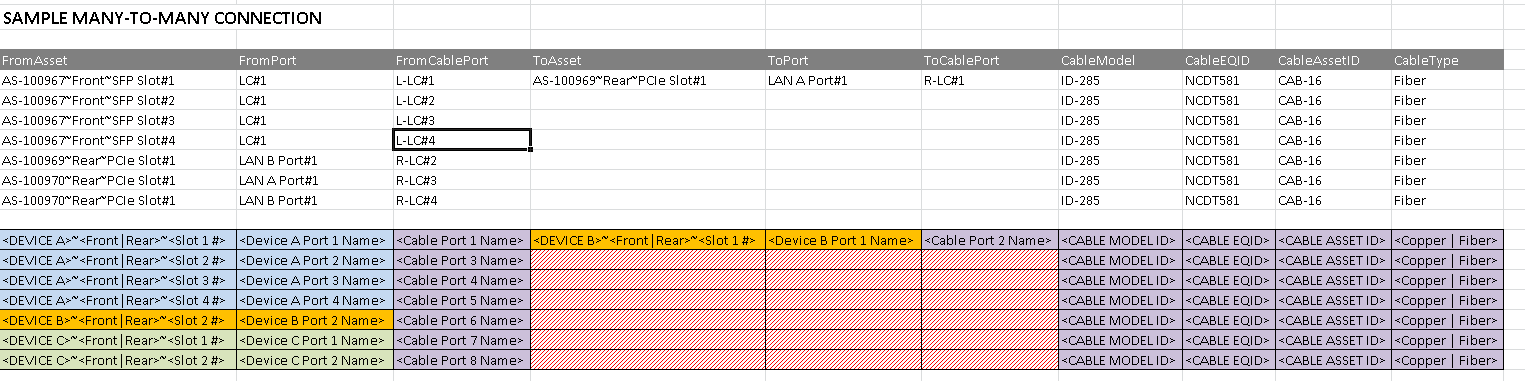
Importing One-To-Many Connectivity
NetZoom also allows users to import one-to-many connections using a standard connectivity sheet. When creating an import sheet for a one-to-many connection, format a single connection as normal. Underneath this connection, add the other connected device, port and cable ports the "fromasset" "fromport" and "fromcableport" columns, while leaving the "toasset" "toport" and 'tocableport" columns blank. Ensure that your cablemodel, cableeqid, an cableassetID are the same. See below for a sample spreadsheet.

Importing Many-To-Many Connectivity
You can also import many-to-many connections in the same fashion. Ensure that the first connection is properly configured, and then follow the same format, with each device, device port, and cable port properly configured.
Import to Update Node Property Data [~EntityName]
Import using feature path: Administration/Tools/Implementation Imports/Settings & Configuration
Note: You may create any additional columns for property edits you wish. Export the Entity to obtain a full list of all available properties. Example of sheet name: [~Server]
- EntID: this is the record’s Primary Key in the database. Use the Property Export to obtain this value before doing a Property Update Import.
Import Tenant Assignment for Devices [TenantDevices]
Import using feature path: Administration/Tools/Implementation Imports/Settings & Configuration
Note: Both the Tenant and the Device must exist in the data center for this update style Import to work.
- Tenant: The name of the Tenant Company. The Company must be in the Tenant group.
- Asset: The Asset ID of the Device to assign to the Tenant Company.
-
Assign: A true or false property. Set to ‘true’ to set tenant assignment or ‘false’ to clear tenant assignment.
Import Business Services with Assignment for Devices [Business Services]
Import using feature path: Administration/Tools/Implementation Imports/Settings & Configuration
- SiteName: The name of the Site where the Asset is located.
- Category: This is the Business Service Category.
- Parent: The name of the Parent Business Service or Application Business Service. Leave this blank when IsApplication is set to False.
- Name: The name of the Business Service.
- Description: A brief description of the Business Service.
- IsApplication: This value is set to False for Business Services (Root Level Services) and if set to True for Application Business Services (Children Services).
- VMID: The Instance ID of the VM or Cloud server to assign to the Business Service.
- AssetID: The Asset ID of the Server or Device to assign to the Business Service.
Import Plan Steps
Import using feature path: Data Center/Change Management/Plan Management/Change Desk/QA:Plans
Note: The Inventory items must be created beforehand.
- Device: This is the Asset ID for the device. If you wish to use a different identifying field, specify the field name in the Device_Field column.
- Device_Field: This specifies the identifying field for the device. If left blank, Asset ID is assumed.
- Parent: This is the name of the new parent Location for floor devices or the Asset ID of the new parent Rack for rack-mounted devices. If you wish to use a different identifying field, specify the field name in the Parent_Field column. When left blank, the Device will be removed from the site and placed in Used.
- Parent_Field: This specifies the identifying field for the Parent. If left blank, Name is assumed for parent Locations and Asset ID is assumed for parent Racks.
- ParentView: This is view of the Parent Rack that the device is mounted, specify either ‘F’ or ‘R’. When left blank, the Parent is a Location.
- DeviceView: This is view of the Device that is mounted, specify either ‘F’ or ‘R’. When left blank, the Parent is a Location.
- BothSide: Specifies if the Device is mounted on both sides of the Parent Rack, specify either ‘False’ or ‘True’. When left blank, the Parent is a Location.
- Position: This is mount position of the Device, specify a positive number for a Slot or Rack Unit and a negative number for an In-Out Plug. When left blank, the Parent is a Location.
Optional fields include:
- Instruction0: Specifies the first custom instruction for the Work Order step.
- Instruction1: Specifies the second custom instruction for the Work Order step.
- Instruction#: Replace # with the next consecutive number to specify additional custom instructions for the Work Order step.
Import Audit Results
Import using feature path: Data Center/Inventory and Audit/Inventory Collection/QA: Import
Note: You may create any additional columns for property edits you wish:
-
Parent: This is the Name of the parent Location for Type ‘Floor’ devices or the Asset ID of the parent Device for Type ‘Mount’ devices.
-
Device: This is the property specified in ‘Barcode Value’ for the device, usually AssetID.
-
Name: This is the Name of the Device.
-
Type: This is mount type of the Device, specify either ‘Floor’ or ‘Mount’.
-
Position: *Required for Type ‘Mount’* - This is mount position of the Device, specify a positive number for a slot or rack unit and a negative number for an in-out plug. When left blank, the Parent is a Location.
-
ParentView: *Required for Type ‘Mount’* - This is view of the parent node that the device is mounted, specify either ‘F’ or ‘R’. When left blank, the Parent is a Location.
-
DeviceView: *Required for Type ‘Mount’* - This is view of the device that is mounted, specify either ‘F’ or ‘R’. When left blank, the Parent is a Location.
-
BothSide: *Required for Type ‘Mount’* - Specifies if the device is mounted on both sides of the parent node, specify either ‘False’ or ‘True’. When left blank, the Parent is a Location.
-
EQID: Specifies an EQID for a new device.
-
Manufacturer: Specifies the Manufacturer for a new device.
-
MfgProdNo: Specifies the Product Number for a new device.
-
Source: Specifies the audit source, use this field to identify who audited this device.
Import Inventory by Project [Inventory by Project]
Import using feature path: Administration/Tools/Implementation Imports/Settings & Configuration
Note: The inventory item must exist in New Devices for this import to work.
- CompanyName: When left blank, this is the Licensee is used, otherwise specify the name of the Tenant Company. The company must be in the Tenant Group.
- Name: The name of the Project.
- Description: A brief description of the Project.
- AssetID: The Asset ID of the Device to assign to the Project.
Import Contracts [Contracts] [*.zip format]
Import using feature path: Data Center/Change Management/Data Center/QA: Contracts
The Contracts feature has Import functionality that requires a spreadsheet along with the content files to be imported from a *.zip file. The *.zip file may have any name. The spreadsheet name must be: [Contracts.xlsx]. The worksheet name must use the name listed in brackets [Contracts].
- Asset: The Asset ID of the Device to assign to the Contract.
- ContractType: The Contract Type, usually Purchase, Service, or Warranty.
- Vendor: The Company name for the vendor that services the contract. The Company must be added to the Vendor Company Group before it can be assigned to a Contract.
- Price: The price paid for the Contract.
- Date: The date of purchase and only required for Purchase Contracts.
- RemindBefore: Specifies the number of days before the end date to generate the alert reminder and is not required for Purchase contracts.
- ValueAfterLifeSpan: The value of the contract or device after the end date has passed.
- UseExpMethod: This value is typically set to False (Normal Calculation Method) and if set to True (Exponential Calculation Method).
- LifeSpan: The lifespan of the device and only required for Purchase Contracts. This value is in months.
- Document: The filename with extension of the Contract Document as included in the *.zip file (for example, WA1.pdf).
- Name: The name for the Document.
- Description: A brief description of the Document.
- StartDate: The start date of the Contract and is not required for Purchase Contracts.
- EndDate: The end date of the Contract and is not required for Purchase Contracts.
Last Updated: Friday, October 30, 2020
NetZoom, Inc.