
Preparing the Network for Discovery
Before any network discovery can take place, certain prerequisites must be fulfilled and the network and its assets must be prepared for discovery. This preparation involves setting your network and its devices so that the devices can be discovered and the required information can be collected. This is done the same way regardless of the discovery or monitoring method you or your client choses.
In order to successfully accomplish discovery scanning, the following list of steps should be reviewed. It is also recommended that the person setting up the scan be familiar with network topology and configuration basics regarding address space, subnet, routers, firewall, ports, SNMP, WMI, etc.
NetZoom products are capable of scans based on the following selections.
- Single IP: The IP address of a single device is discovered
- IP Range: A range of contiguous IP addresses of devices is discovered
- Network subnet range: A block of the network subnet is discovered
- DNS: A DNS query-based discovery. In order to obtain a list of hosts via DNS, the target DNS server must allow Zone Transfer privileges to the server that is conducting the discovery.
- Scanning Hosts listed in Active Directory: An Active Directory query-based discovery. Requires authentication to access Active Directory Information.
When NetZoom discovery is provided with a list/range of IP addresses to scan.
- There must be routes to the target IP addresses.
- Any firewall between NetZoom or NetZoom and target IP must allow some of these ports. Not all the ports listed are necessary but will increase the chances of successfully discovering nodes.
- Ping (ICMP 0, 8)
- SNMP (UDP 161, 162)
- WMI (TCP 135)
- TCP (Common Ports) (TCP 21, 23, 25, 80, 110)
- IPMI (UDP 623)
- SSH (user defined)
- WSMAN (user defined)
- RDP (TCP 3389)
- VNC (user defined)
- Any firewall implemented at the target IP must be disabled/ports opened to the following list of ports. Not all the ports listed are necessary but will increase the chance of the node being discovered.
- Ping (ICMP 0, 8)
- SNMP (UDP 161, 162)
- WMI (TCP 135)
- TCP (Common Ports) (TCP 21, 23, 25, 80, 110)
- IPMI (UDP 623)
- SSH (user defined)
- WSMAN (user defined)
- RDP (TCP 3389)
- VNC (user defined)
- For Microsoft Windows-based machines, WMI access privileges and fully functional RPC/DCOM access are needed at the target node.
- SNMP service must be installed and configured properly in target nodes.
- TCP port scanning may trigger Network Intrusion Alerts if network intrusion detection is implemented within an organization.
When using SNMP
SNMP Read Community-SNMP read community acts like a password. The scanning server must correctly identify the target node’s read community string in order to read the SNMP values of the target node.
Configuring the Remote Windows Device
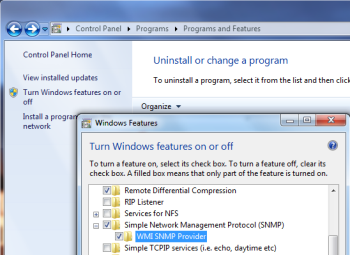
- Install the Simple Network Management Protocol and WMI SNMP Provider.
- Control Panel > Add & Remove Programs > Windows Components > Management and Monitoring Tools > Details
- Check the boxes for Simple Network Management Protocol and WMI SNMP Provider.
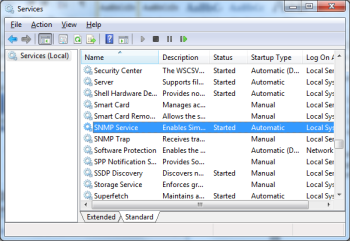
- Access the Properties window for the SNMP Service under Services.
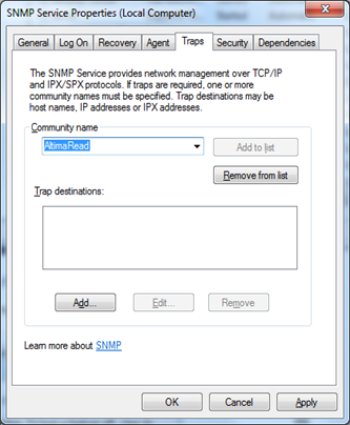
- In the Traps tab, enter the community string or SNMP credential NetZoom will be using to connect.
- In the Security tab, check [X] “Send Authentication Trap.”
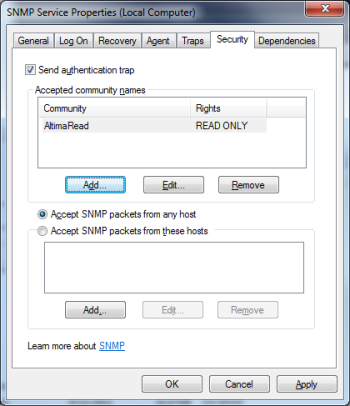
- Click the [ADD] button under “Accepted Community Names.”
- Enter the community string or SNMP credential NetZoom will be using to connect.
- Select “Accept SNMP packets from these hosts” and click the [ADD] button.
- Enter the localhost and the IP address of the NetZoom machine.
When using WMI
RPC (Remote Procedure Call) is a Microsoft mechanism for communication between processes. See here (http://technet.microsoft.com/en-us/library/cc738291.aspx) for details. RPC must be available on the monitored device in order to use WMI.
If an error indicates that the monitored device is unavailable, this usually means that it is not possible to connect to the device. Be sure that the default WMI port, 135, is not blocked or preempted on the target device. Microsoft provides a utility called WBEMTEST that can be used to confirm that WMI is properly configured on the target device.
- Run the Windows Management Instrumentation Tester by navigating to: Start/Run/WBEMTEST.
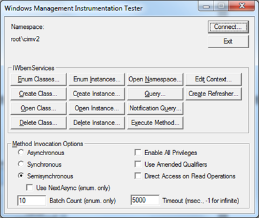
- Click the [CONNECT] button.
- Under Namespace, enter “\\hostname or IP address\root\CIMV2”.
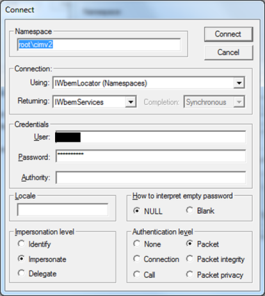
- Enter the same credentials you're using with your scanner.
- If you have verified credentials but cannot connect using WBEMTEST and cannot see the expected WMI classes and counters, then WMI is probably disabled or configured incorrectly on the target machine.
Firewall
The firewall on target node and any firewall between the scanning server and target node must allow WMI port TCP 135 to be opened.
DNS
The machine running NetZoom or NetZoom discovery must have access to the DNS server. Alternatively, all of the target hosts must be mapped within the LMHOSTS file.
Important Notes:
Some Windows and Windows Server WMI are inaccessible even via administrator level accounts.
Registry edit on remote machine:
- Start the run command from the Windows Start Menu.
- Type regedit.exe to start the Registry Editor. If you get the UAC prompt, acknowledge it.
- Locate and then click the following registry subkey: HKEY_LOCAL_MACHINE\SOFTWARE\Microsoft\Windows\CurrentVersion\Policies\System
- On the Edit menu, select New and click DWORD (32-bit) Value.
- Type ‘LocalAccountTokenFilterPolicy’ to name the new entry, and press Enter.
- Right-click ‘LocalAccountTokenFilterPolicy’ and click Modify.
- In the ‘Value’ data box, type ‘1’, and click OK.
- Exit Registry Editor. There is no need to reboot the machine.
Additional Notes on Intel DCM
For Intel® DCM to Discover, Monitor or Manage a device:
- The device must have Intel® Intelligent Power Node Manager 1.5/2.0 with IPMI interface exposed, the device is an HP* Integrated Lights-Out (iLO) 2/3/4 platform with DCMI interface enabled, the device is a Cisco*/Fujitsu platform with DCMI interface enabled, the device is an IBM* enclosure/blade with AMM interface exposed, the device is an HP* enclosure/blade with OA interface exposed, the device is an IBM*/Dell* server with IPMI interface exposed, the device is an HP* server with LO100 interface exposed, the device is a Dell* enclosure with CMC, the device is a Dell* 11G platform with iDRAC6 enabled, the device is a Dell* 12G platform with iDRAC7 enabled, the device is a Cisco* UCS chassis/blade which can be managed through Cisco* UCS Manager, the device is a Cisco* switch with EnergyWise Technology enabled, the device is a PDU from APC*, Avocent*, Dell*, Eaton*, Emerson*, ServerTech* with SNMP interface exposed, or the device is a UPS from APC*, Dell*, Eaton*, Emerson* with SNMP interface exposed, the device is a Microsoft* Windows server which can be managed through WMI, the device is a Microsoft* Windows server which can be managed through SSH.
- For thermal monitoring, the platform must support inlet temperature sensors. These sensors must be exposed via either Intel® Intelligent Power Node Manager 1.5/2.0 or IPMI 2.0 over LAN.
- Intel® DCM requires exclusive access to manage a device. It does not recognize policies set on managed devices from different sources.
Except for managing with the generic IPMI 2.0 interfaces, the BMC user through which Intel® DCM communicates with nodes through the IPMI protocol must have the ADMIN privilege level. The node must be configured to allow the ADMIN role to use at least one of the cipher suite levels 0-3. By default, Intel® DCM will try the cipher suite from 3 to 0 in IPMI negotiation phase l in case the exact cipher suite for communication is not specified.
Note that to enable the feature of managing Microsoft* Windows servers through WMI, Intel® DCM should be deployed on a Windows server with Microsoft* Visual C++ 2010 Redistributable installed.
For the latest information on Intel DCM refer to the manufacturer website. http://www.intel.com/dcm/
Known Limitations of Intel DCM
- If another application registers for an IPMI event before Intel® DCM registers for that event, Intel® DCM may not receive that event.
- Whenre-installing Intel® DCM, if you choose to keep the current database but change to a new installation directory, it may cause Intel® DCM service to start incorrectly. It is recommended not to change the installation directory.
- Intel® DCM reference UI only keeps the settings for the exact same URL. Even for the same node, a URL that uses local host and a URL that uses an IP address, are regarded as different URLs. For example: You opened a reference UI by https://localhost:8643/DcmConsole/ and configured your settings, then reopened the reference UI by https://192.168.0.1:8643/DcmConsole/, the settings may not be the same. Please always use the same URL to open the reference UI.
- For reference UI node support, it is not recommended to use reference UI to manage more than 64 nodes.
- When tier-two server(s) is managed by one central server, it is not recommended to use the reference UI on the tier-two server. Please also make sure the system time on the central server and tier-two servers are synchronized.
- You shall avoid using two central servers to manage one tier-two server at the same time.
- When a network connection is unstable, Intel® DCM cannot successfully query monitoring data from nodes and a communication exception is reported. Intel® DCM server automatically resumes monitoring when network connection is restored.
- If the power consumption data or the temperature data of a node is not able to be retrieved (For example, the network connection is unstable), Intel® DCM aggregates the data of the groups containing the node by assuming the data for the node is 0.
Note
*Other names and brands may be claimed as the property of others.
For the latest information on Intel DCM refer to the manufacturer website. http://www.intel.com/dcm/
Last Updated: March 04, 2022
NetZoom, Inc.